A whole post on wedding accessories?! Most definitely! These were some of my favourite details to puzzle through and they really helped to complete the wedding looks. There were also lots of learnings and mistakes I made along the way!
I love accessories and as I was going for a “vintage glamour” look for my wedding, it was essential to have these details in place as these pieces were so important in mid-20th Century looks: think of the matching hat, bag, gloves, shoes, and belt in many 1940-60s reference images. I had a lot of fun getting stuck in and spent many hours searching the internet for the perfect items for me. In this post, I’ll talk about some of the choices I made.
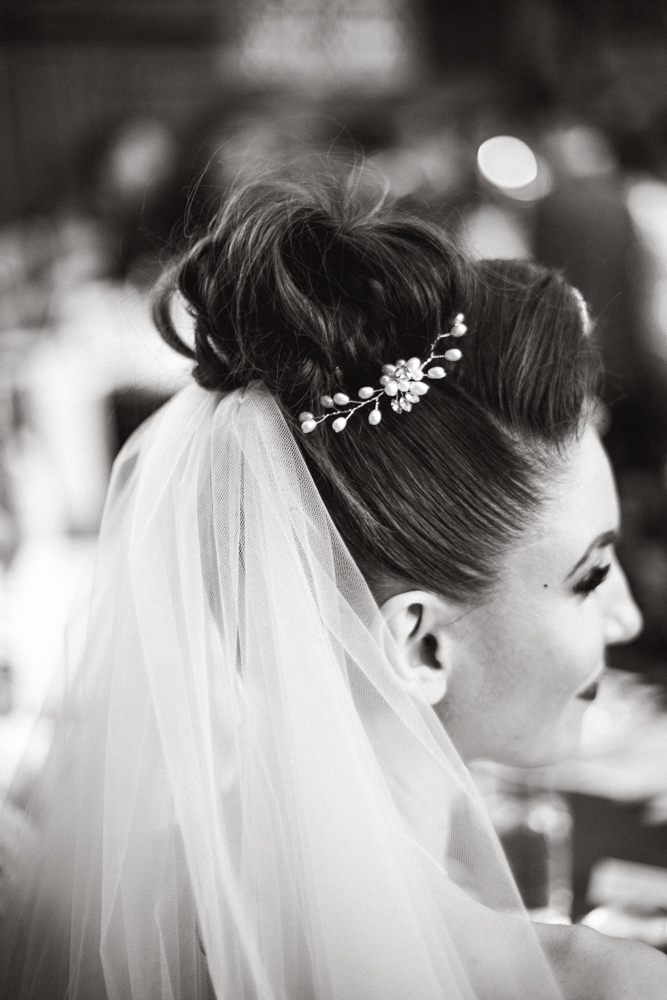
The veils
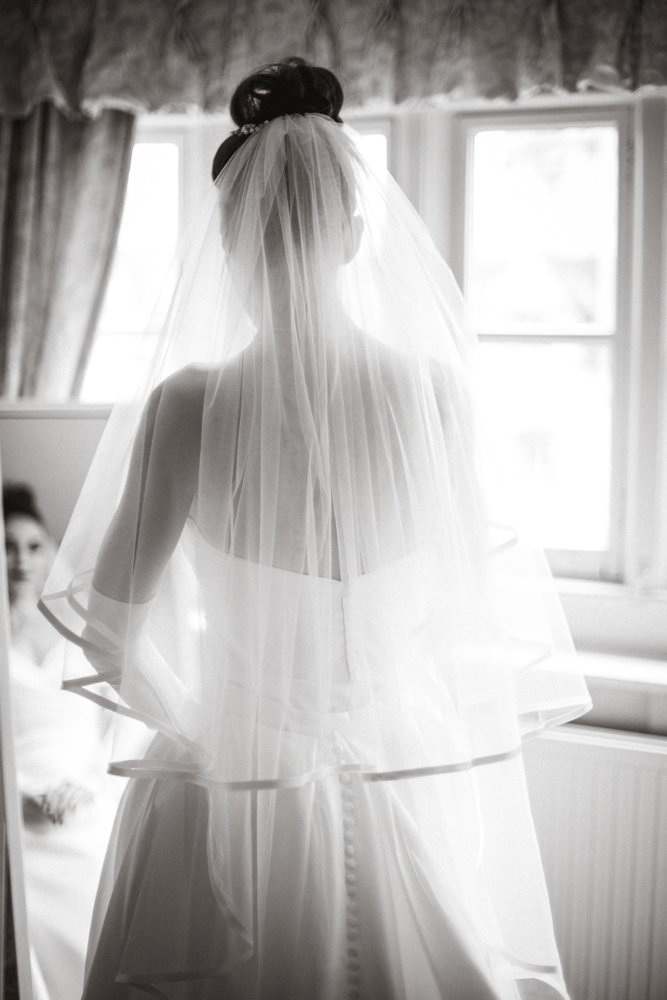
Firstly, I decided that I did want to wear a veil, purely because I liked the look and not as I was buying into any of the old-school sexist connotations associated with female virginity, modesty, or purity. After all, we were celebrating in my university from where I’d earned three degrees, so I felt there was enough counter-symbolism going on to neutralise the historical negativity for me. Little did I know, however, but there are loads of decisions involved in selecting a veil, for example (and in case it helps anyone embarking on this process):
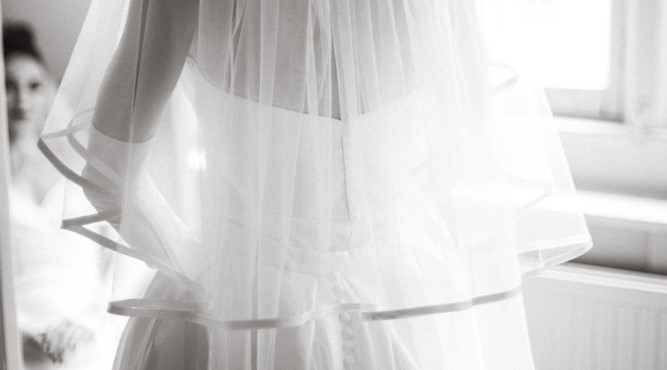
- Fabric type: veils are generally made from a delicate tulle net/mesh fabric, but I’ve also seen silk veils available. Tulle can be a flat colour or available in glitter options with some sparkle.
- Length: There is a whole baffling vocabulary to veil lengths! They are generally listed as lengths compared to the body when short (shoulder length, fingertip length etc), but then, for some bizarre reason, the longer ones go by size of religious venue: chapel, cathedral, and even abby length. “Waltz” length is a bit of a rouge outlier! For a long veil, it’s generally recommended to have it slightly longer than the train of the dress.
- Tiers: Single-tier veils hang down the back looking lovely. Two-tier veils have a longer tier at the back and a “blusher” to cover the face when walking down the aisle, which is then pulled back when reaching the groom #drama.
- Edging type: options include the raw edge of the tulle fabric, they can be rolled to create a very thin border, or edged in something more substantial like a satin band, beaded trim, or lace trim. There are lots of glam options to explore to go with the dress.
- Colour: it’s generally advisable to match this to the gown, so white, off-white, light ivory, ivory, champagne, black etc, but there are so many options: you can have it as your “something blue” if you like! I’ve seen ombre-dyed veils to pick out wedding accent colours and even glorious rainbow veils to make a statement!
- Embellishment: veils can feature more or less embellishments as desired, usually in the form of lace applique, but also pearl or glass beads dotted throughout. Some veils are designed to match specific dresses to complement the lace placement pattern or edge shape of the train, so ask if your dress has a “matching” veil from the designer.
- Attachment type: a comb, clip, or headband are all bewildering possibilities!
Wow, that’s a lot, right!? Through a process of elimination and trying on various veils with my dresses, I came to some decisions:
I chose to have a blusher as, like any drag fan, I love a “reveal” moment!
For my ceremony dress, I selected a fingertip length, satin edge, double-layer veil in light ivory. I loved the way the satin edge matched the fabric of my dress and created a little bit of interest around the shoulders with the edging showing against my skin. I chose fingertip length as I didn’t want to be hauling around an enormous veil all day- I would have needed an epic abby-length veil to cover the length of my overskirt train! I liked that I could leave it in all day without the risk of treading on it and ruining it. I chose to have a blusher as, like any drag fan, I love a “reveal” moment!
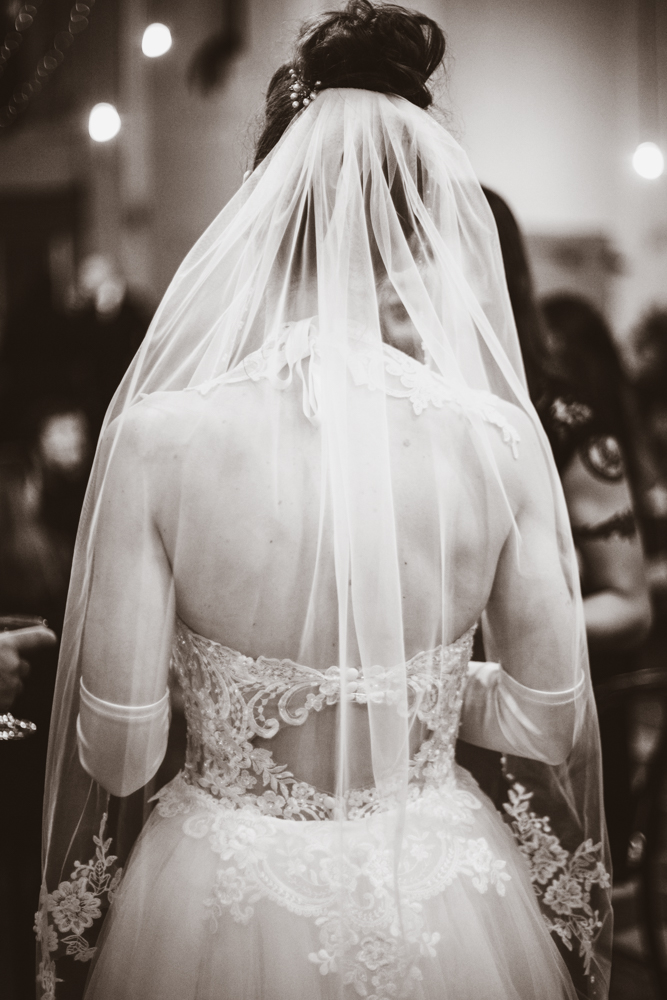
For my evening party dress, I selected a fingertip length, single-layer veil with a raw edge, but with some beaded lace applique around the hem to complement my bustier and other accessories. I didn’t want the detail of a second layer, nor the “faff” of a very long veil for my evening party. Again, the lace detail added some interest to my shoulders when I let it hang in front.
The shoes
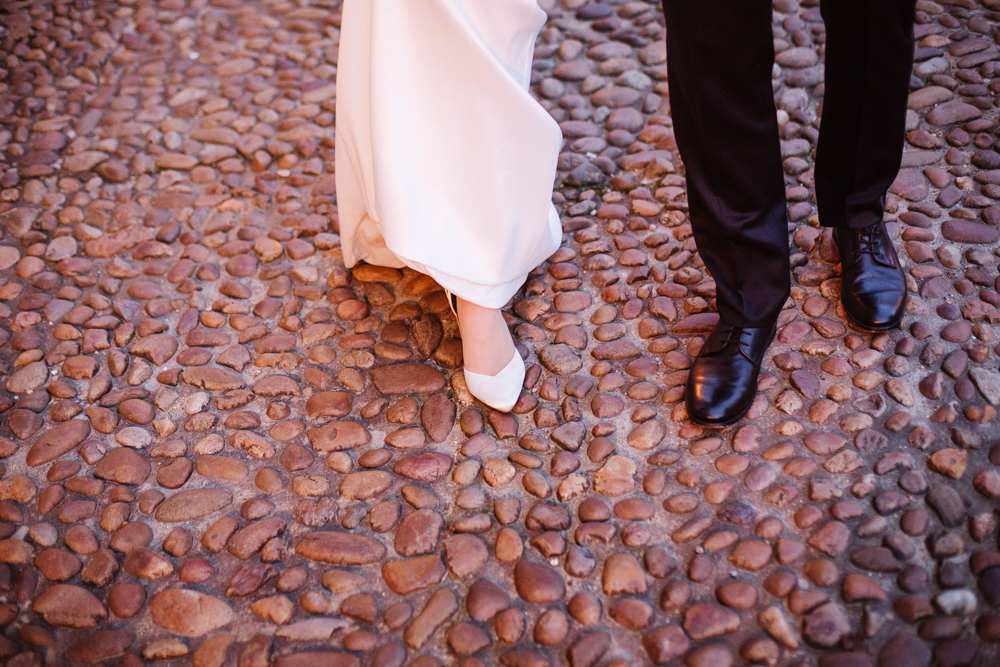
with a long gown, the only thing you’re going to see is the toe poking out, so this part is very important…
Initially, I had wanted to wear silver vintage reproduction high-heel sandals from Remix, which would double as dance shoes after the wedding (thrifty!). However, when trying them on with my ivory and off-white gowns, I felt that the silver colour was a little too “cool” in tone to work. Also with a long gown, the only thing you’re going to see is the toe poking out, so this part is very important. The peep-toe style of these caused issues as I wanted to wear my signature vintage contrast seam stockings, so I might have had a visible black toe seem- not the look I wanted! I had to find a plan “b”…
Wedding shoes: basically all you can see of them!
While there are lots of companies making bridal shoes, I wasn’t hopeful about finding something with a vintage feel, thinking this was a niche requirement, but I was pleasantly surprised! I found a lovely pair in ivory satin with an elegant t-bar fastening at an affordable price point from Paradox. The heel was curved and relatively thick, just like vintage-style shoes, and the height was perfect. However, when trying with my dress, I wasn’t happy with the rounded shape of the toe (again, the importance of the toe area comes to life when trying with your gown).
they will dye your satin bridal shoes to any colour of the rainbow…
I returned these and ordered a pair from Rainbow Club, an innovative brand that offer a send-back service where they will dye your satin bridal shoes to any colour of the rainbow for you to use with other outfits beyond your wedding day – love it! I found a pair in ivory satin with an elegant pointed toe. I was initially nervous about the pointed-toe as they are notoriously uncomfortable, but, as I slipped them on, I felt lovely thick padding and thought: “I can actually wear these!” The heel is a block shape at a modest 4 inches, so stable and manageable for me. I decided to compromise on the vintage heel shape in favour of the more elegant and visible toe. Shoes = sorted.
The gloves
For a vintage-inspired look, I HAD to have gloves! However, I would need my left hand available during the ceremony for putting on rings, so this presented a challenge! Options I considered were tulle “sleeve” fingerless gloves with little pearls that finished halfway across the hand (very trendy for wedding season 2023, apparently!), or “v” shaped gloves with a ribbon around the middle finger.

For my ceremony dress, I decided to wear opera-length ivory satin “v” shaped gloves to give the full effect. This was more dramatic but also simple and worked well with the whole look. For the evening, I found a similar pair but with some embellished lace applique on the hand for a lovely mirrored contrast between the day and evening looks.
The jewellery
I decided I wanted pearls as an accent as they look great with ivory and, again, have that vintage-inspired feel as they were hugely present in mid-20th Century wardrobes. I purchased a single pearl drop necklace on a silver chain from an Etsy seller to keep things simple and elegant. I also purchased some lovely pearl hair pins to accessorise my up-do, visible once my blusher had been lifted. I don’t have pierced ears and don’t usually wear earrings, so didn’t for the wedding.
I found a gorgeous high-neck lace collar from a German Goth seller on Etsy…
For the evening, I was determined to get dramatic! I have a long neck and decolletage area so wanted to create some detail and “fill in” some of the blank space that I feel self-conscious about sometimes. I found a gorgeous high-neck lace collar from a German Goth seller on Etsy. To my surprise, they also offered the collar in off-white as well as black. When trying it on with my dress, it worked really nicely but I was bothered that it didn’t have embellishments to match the bodice. I “harvested” the sparkly elements from a dress I’d purchased to wear for other events around my wedding and I individually hand-sewed pearlescent sequins, glass beads, and tiny pearls onto the neckpiece… This was time-consuming but well worth the effort!
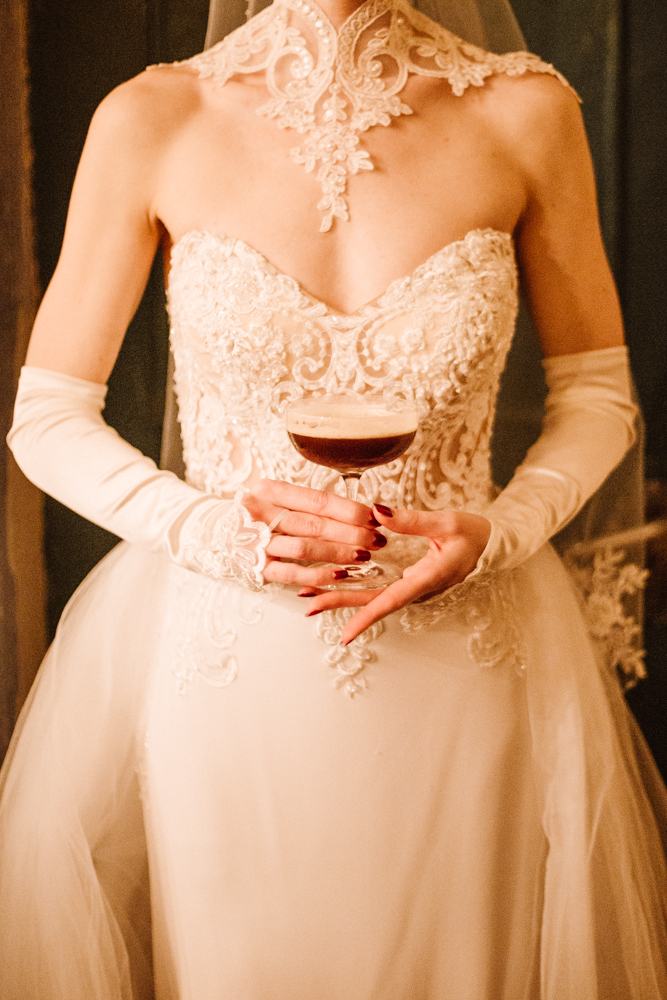
An espresso martini is another crucial wedding accessory…
What I learned when selecting accessories:
- Try on the whole look together to make final decisions: the picture comes to life when all the elements are brought together with the dress. I tried to zoom in and out, thinking about specific details, but then considering the overall picture for things like proportions and embellishments.
- Accessories can be expensive so it’s good to shop around online and consider second-hand. Veils were much more expensive than I had predicted, especially from the bridal boutiques (I tried on one that cost £800!!). I shopped around online and found a lovely company, The Wedding Veil Shop, with a huge selection at much more reasonable prices (mine was c.£90). Check out Etsy and second-hand platforms like Vinted and eBay for accessories at much lower prices, and the ethical value of being made by smaller companies. But beware that colour-matching is an art and these sellers might not always have it right….
- Colour matching can be challenging but many companies will help: I bought a veil online in completely the wrong colour- it was aggressively blue-white rather than a warmer off-white- and I wasn’t able to return it. Fortunately, it was inexpensive, but I wanted to get the final veil correct. Many boutiques will help you out if you share a photo of your gown, or a tip is to look at the label which might have a description of the colour. My satin gown was labelled as “light ivory”, a colour I didn’t even know existed, but it made a difference when selecting a veil to match.
- Have your wedding shoes chosen, or at least the heel height decided before going for your alterations. It’s such a pain to be tripping over a long dress hem, you’ll want to get this right.
- When choosing shoes, concentrate on the toe shape and heel height/stability: If you’re wearing a long gown, the toe will be visible as you walk so, visually, it’s the most important element. Practically, you’ll want to be able to move confidently down the aisle when feeling perhaps a little nervous, and around your wedding all day without being in agony. You’ll be happy you considered a little practicality in your choice of heel height and shape, trust me!
- Don’t be afraid to customise: I added embellishments to my plain lace collar which brought it to life. You can also buy things like clips for the front of your shoe if you want pearl or bead embellishments.
I had such fun putting together the accessories for my wedding! They completed the looks and the veils, in particular, felt special to wear. The gloves were another favourite detail and gave that nod to Audrey Hepburn in Sabrina that I wanted. I have to confess that my shoes were comfortable for *most* of the day, but pinched by the evening- inevitable of most high-heels, I suppose. One change I would make is to have my evening party dress shortened so I could have worn my Dr Marten boots instead! 🤘
Thanks for reading 🥰 Hit Follow to receive brief notes letting you know when I’ve posted a new article, and in the meantime, check out my Instagram and YouTube channels for more (Un)Popular content!